Your first app
You'll build a "Game Night" sign end to end, a pawn image plus two words, entirely in Glance Dev Studio: create the app, edit its code, drag the image into place, and check that it works. No terminal required (there's a command-line version at the bottom if you prefer it).
1. Create the app
Open Glance Dev Studio and click + Create New App. Give it the name Game Night, set the panel width to 128 x 32, pick a category, choose how often it should refresh (once an hour is plenty for a sign), and add one setting, a Game time text box (you'll use it in a moment). Click Create app:
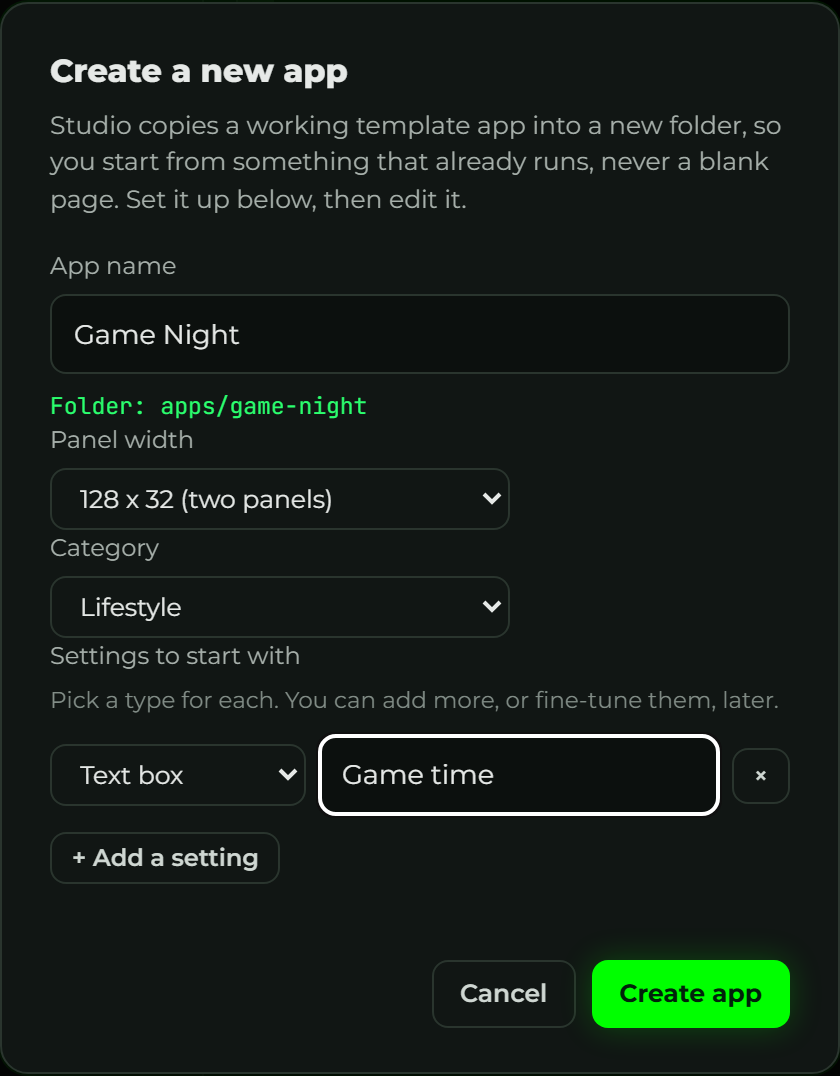
Studio makes the folder apps/game-night/ with two working starter files, so you never
stare at a blank page. It opens the new app right away, ready to edit.
2. Draw the text
The left side is app.star, the code that draws the screen. It comes with a small
starter. Select all of it and replace it with the two words. Leave the left side empty for
now, that's where the pawn will go:
def sign(c, ctx):
    c.fill("black")
    c.text("GAME", 30, 4, font="7x12", color="green")
    c.text("NIGHT", 30, 18, font="7x12", color="white")
Press Save & Render (or Ctrl+S) and the live preview on the right updates instantly:
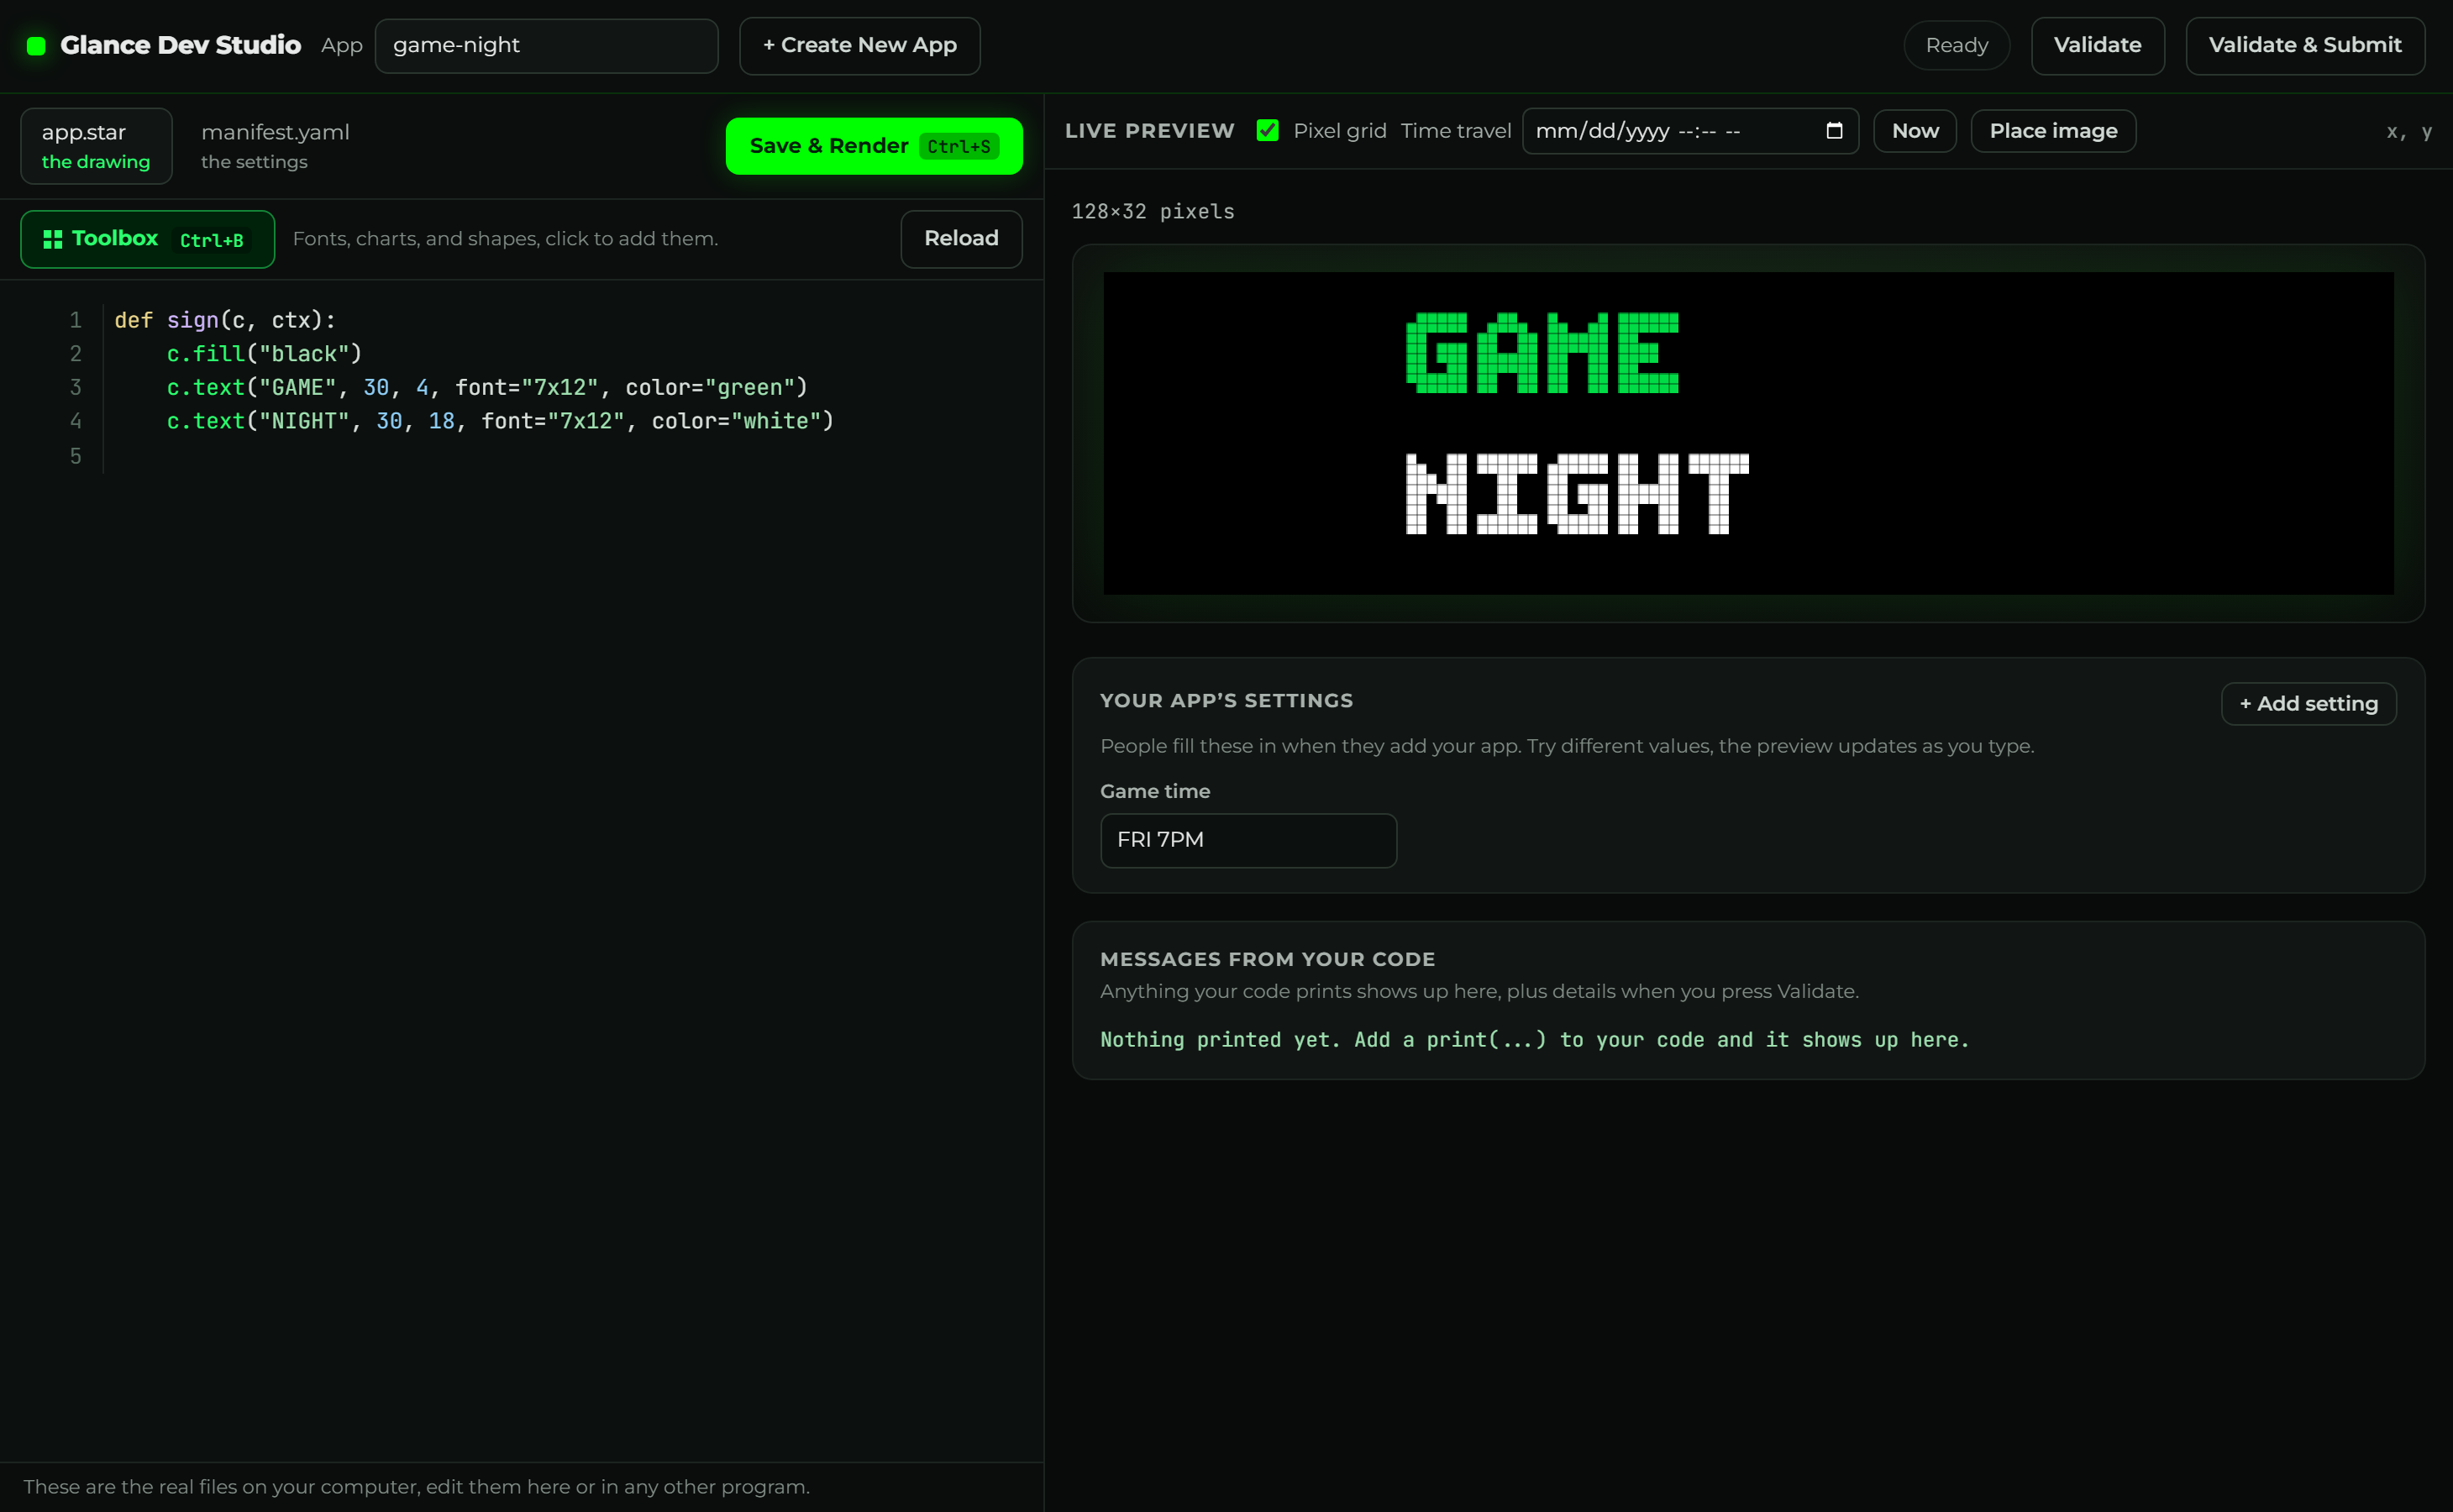
The manifest.yaml tab says pages: [sign], so app.star defines def sign(c, ctx).
That one function is the whole app.
3. Add the pawn image
An app can only draw images it declares. Save this PNG as pawn.png inside the
apps/game-night/ folder, then open the manifest.yaml tab and list it under
assets:.

pawn.png, a plain PNG with a transparent background. No conversion, no encoding (more in Working with images).assets:
- pawn.png # every image you draw must be listed here
Now the pawn is available to the app. You'll put it on the panel in the next step.
4. Place the pawn by dragging
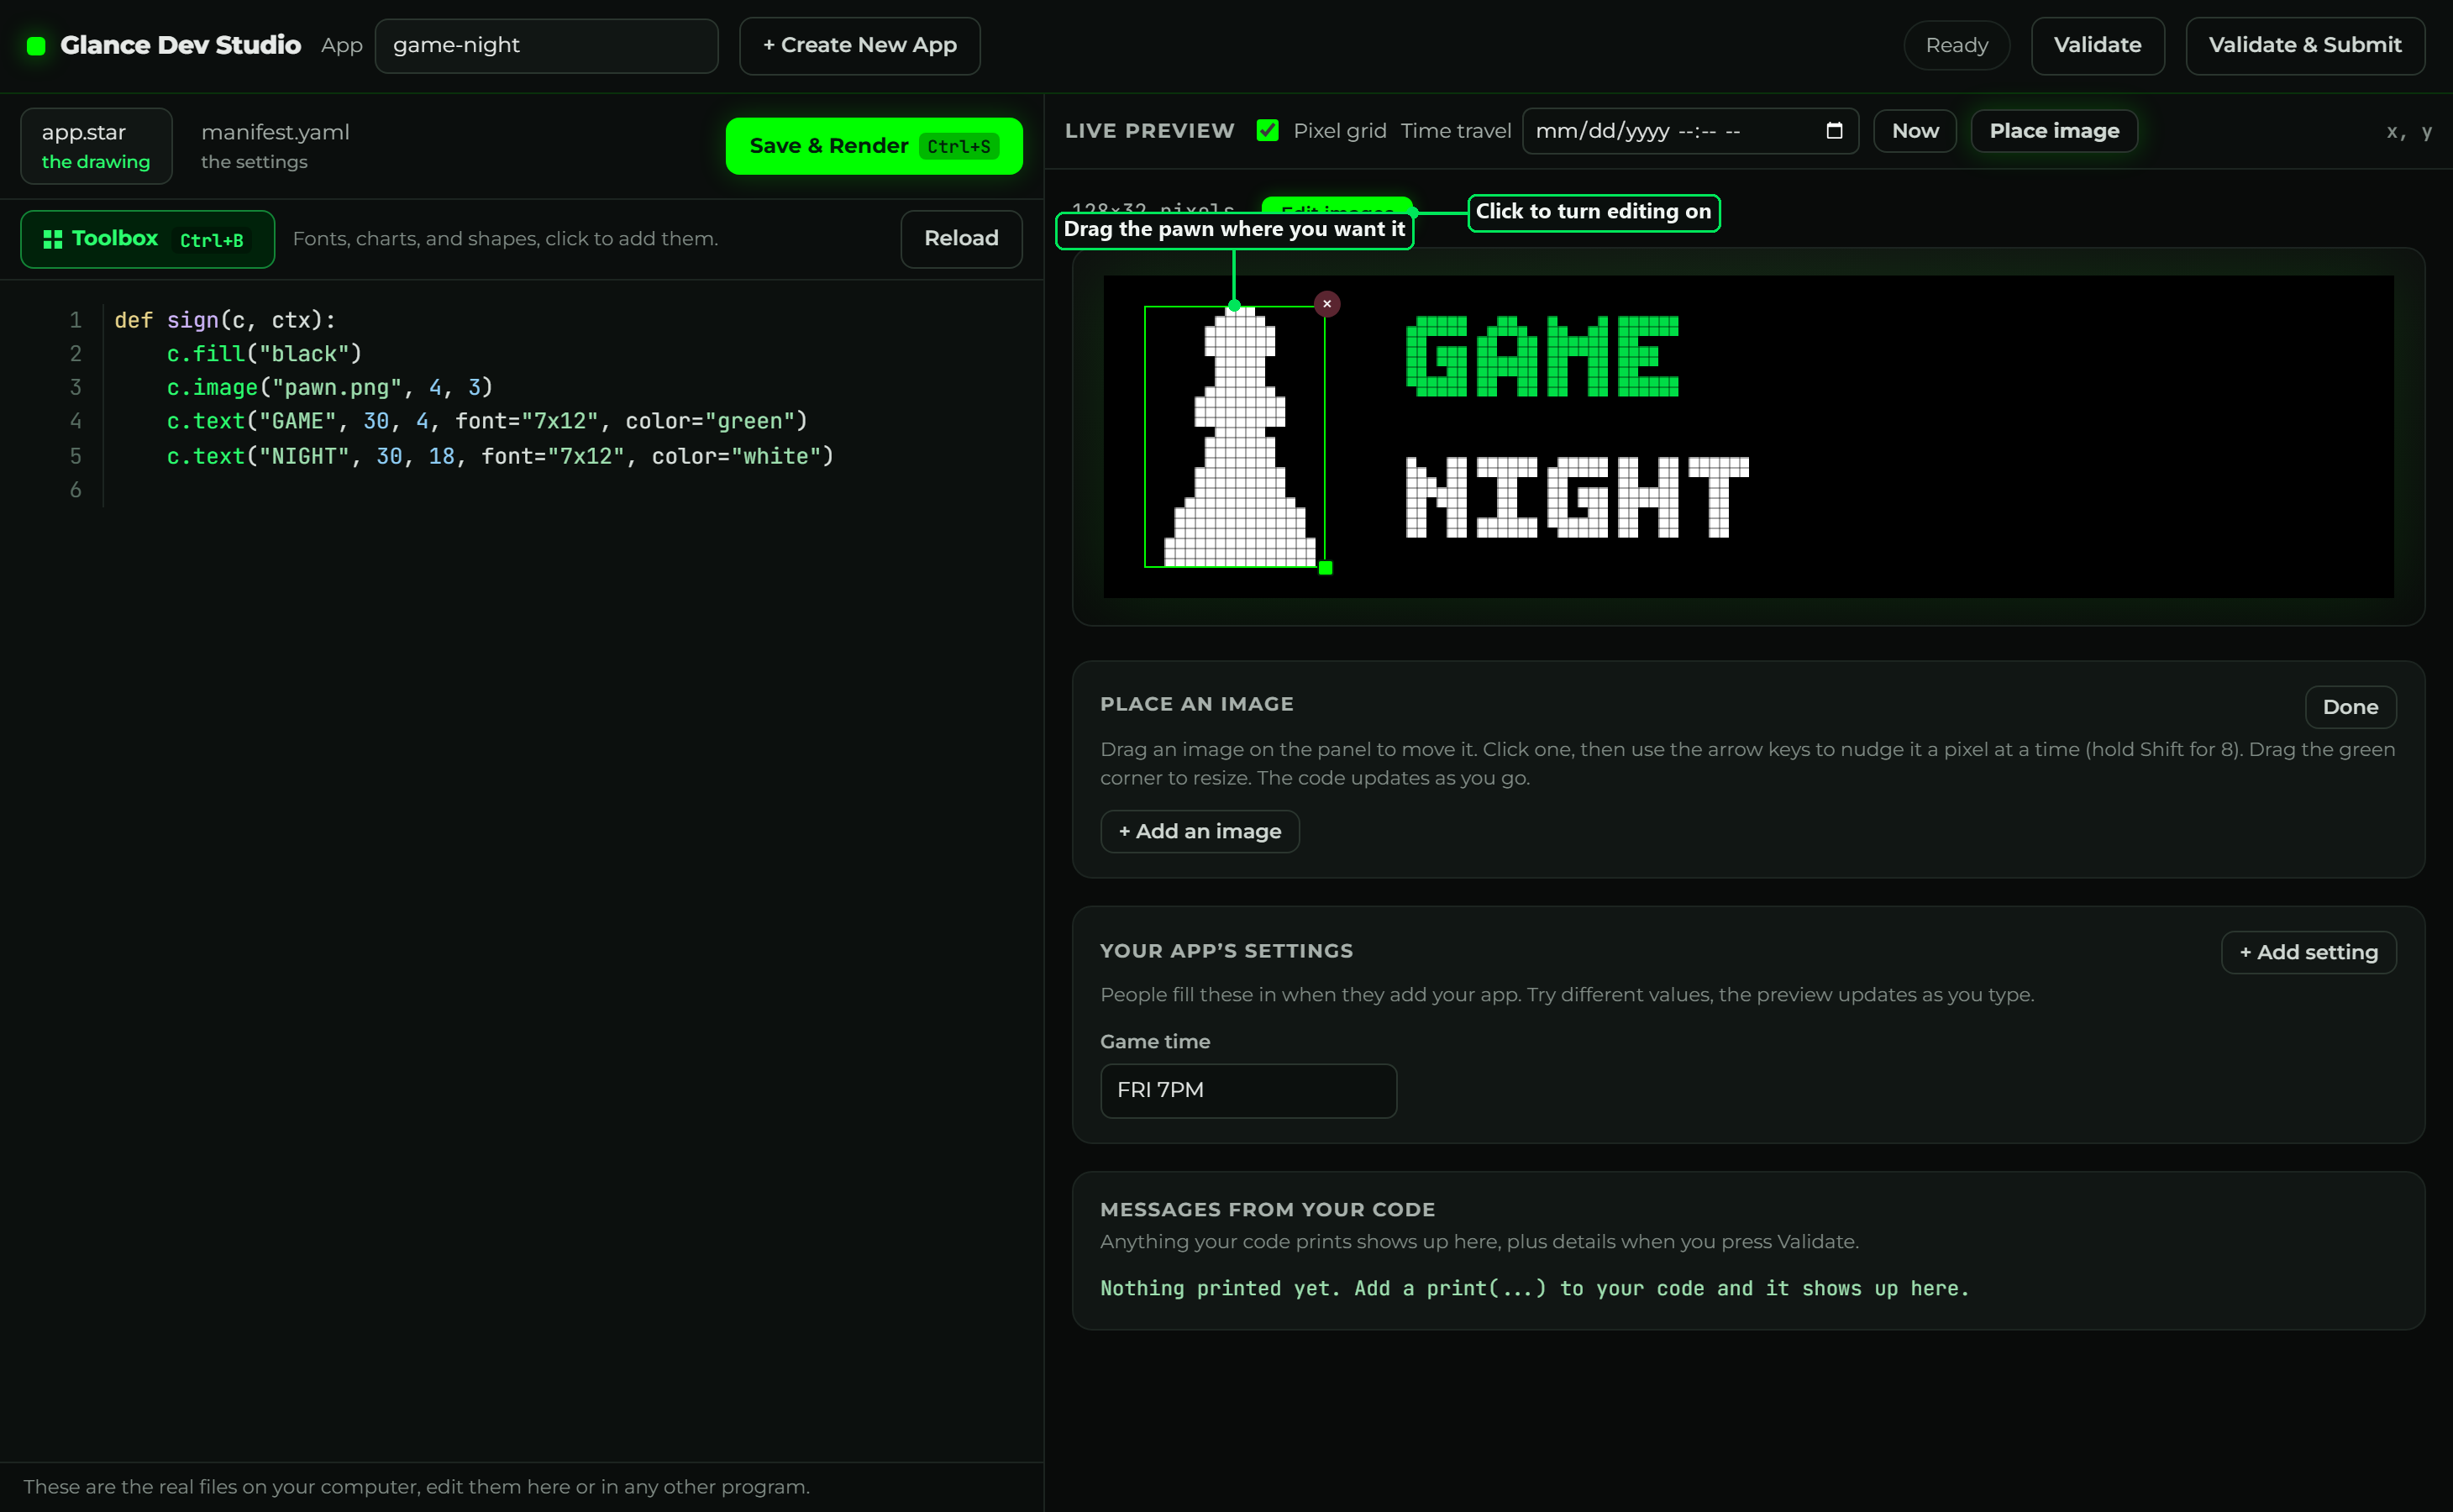
You don't have to write the c.image(...) line or guess coordinates. Let Studio do it:
- Click Edit images next to the panel size (it lights up green).
- Click + Add an image and pick
pawn.png. It drops onto the panel. - Drag it to the left of the text. Studio writes the
c.image("pawn.png", x, y)line into your code as you move it. - Fine-tune with the arrow keys (one pixel at a time), or drag the green corner to resize.
See Working with images for the whole tool.
5. Where did everything land?
The numbers in those calls are pixel coordinates, and they all follow one rule:

- The origin
(0, 0)is the top-left pixel.xgrows right,ygrows down. - For images and text,
(x, y)is the top-left corner of what you draw.c.image("pawn.png", 4, 3)puts the pawn's top-left corner 4 pixels from the left and 3 pixels down. c.text("GAME", 30, 4...)starts at x=30, to the right of the pawn, and"NIGHT"at y=18 sits below it (bigger y = lower).
One detail: the text is UPPERCASE on purpose. The bitmap fonts only contain capital letters, so lowercase characters are silently skipped.
6. Show the game time with a badge
Now use that Game time setting. Open the manifest.yaml tab and make sure the input is
a text box named time with a default:
inputs:
  - key: time
    type: string
    app_input_type: free-text
    label: Game time
    default: "FRI 7PM"
Then put it on the sign. You don't have to remember the code, use the Toolbox. Click Toolbox (or press Ctrl + B), find c.badge under Widgets, and click it:
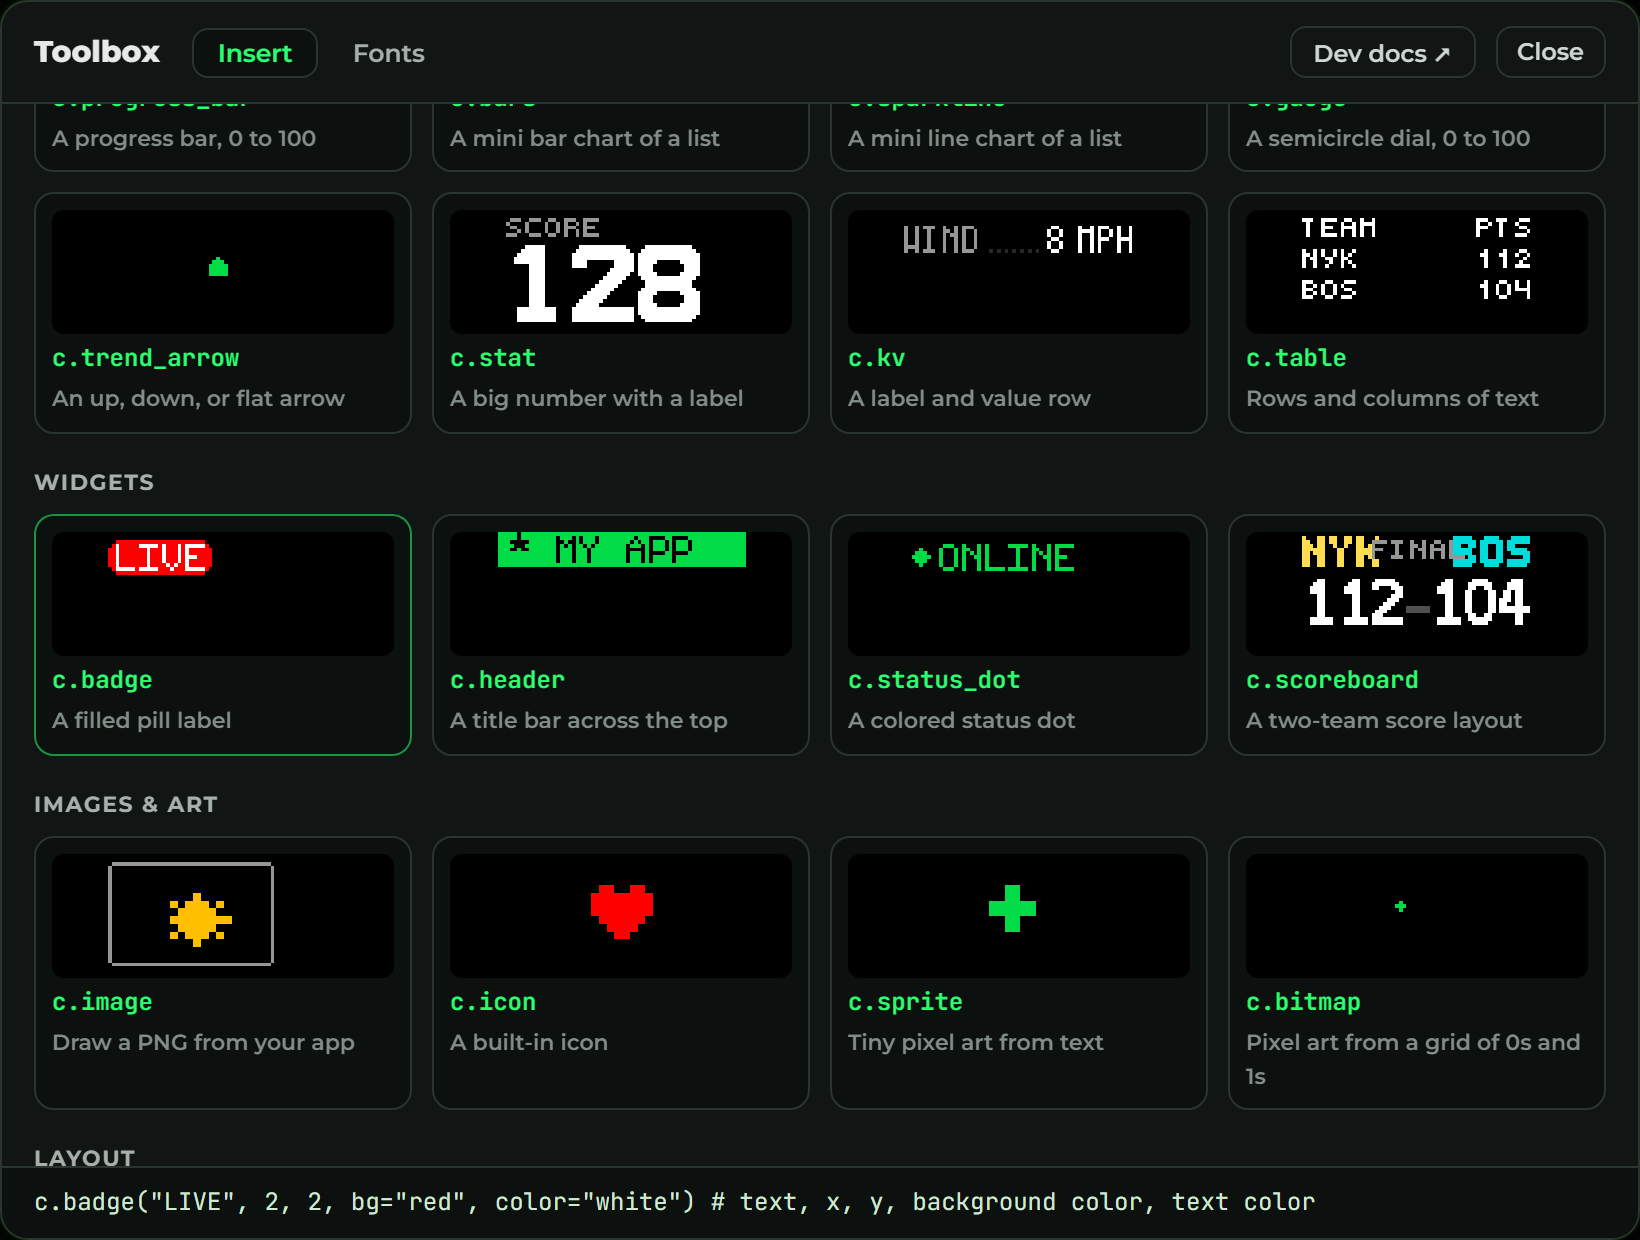
Studio drops a c.badge(...) line into your code with a comment explaining each part. Change
it to read the setting and sit to the right of the text, so your app.star reads:
def sign(c, ctx):
    c.fill("black")
    c.image("pawn.png", 4, 3)
    c.text("GAME", 30, 4, font="7x12", color="green")
    c.text("NIGHT", 30, 18, font="7x12", color="white")
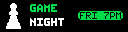
    c.badge(ctx.inputs.get("time", "FRI 7PM"), 78, 11, color="black", bg="green")
ctx.inputs.get("time", "FRI 7PM") reads the Game time setting, using "FRI 7PM" if it's
blank. Save & Render:
7. Change it live
Look at the Your app's settings card under the preview, it now has a Game time box.
Type a different time, like SAT 8PM, and the badge updates instantly, no code change. That
setting is what people fill in when they add your app (see
User input types for what they see on their phone).
8. Add a second page
An app can cycle through more than one screen. Say you want a second page that credits
whoever's hosting. You don't have to edit two files by hand: under the live preview, click
+ Add page and name it hosted.
Studio adds it to manifest.yaml (so the line reads pages: [sign, hosted]) and writes
a matching def hosted(c, ctx) in app.star, then renders it right away. Add a Hosted by
setting with + Add setting (name it host), then fill in the new page:
def hosted(c, ctx):
    c.fill("black")
    c.text_center("HOSTED BY", 5, font="5x7", color="green")
    c.text_center(ctx.inputs.get("host", "THE SMITHS"), 18, font="6x8", color="white")
Now the panel shows both screens, and the real Glance cycles through them in the order they're listed:
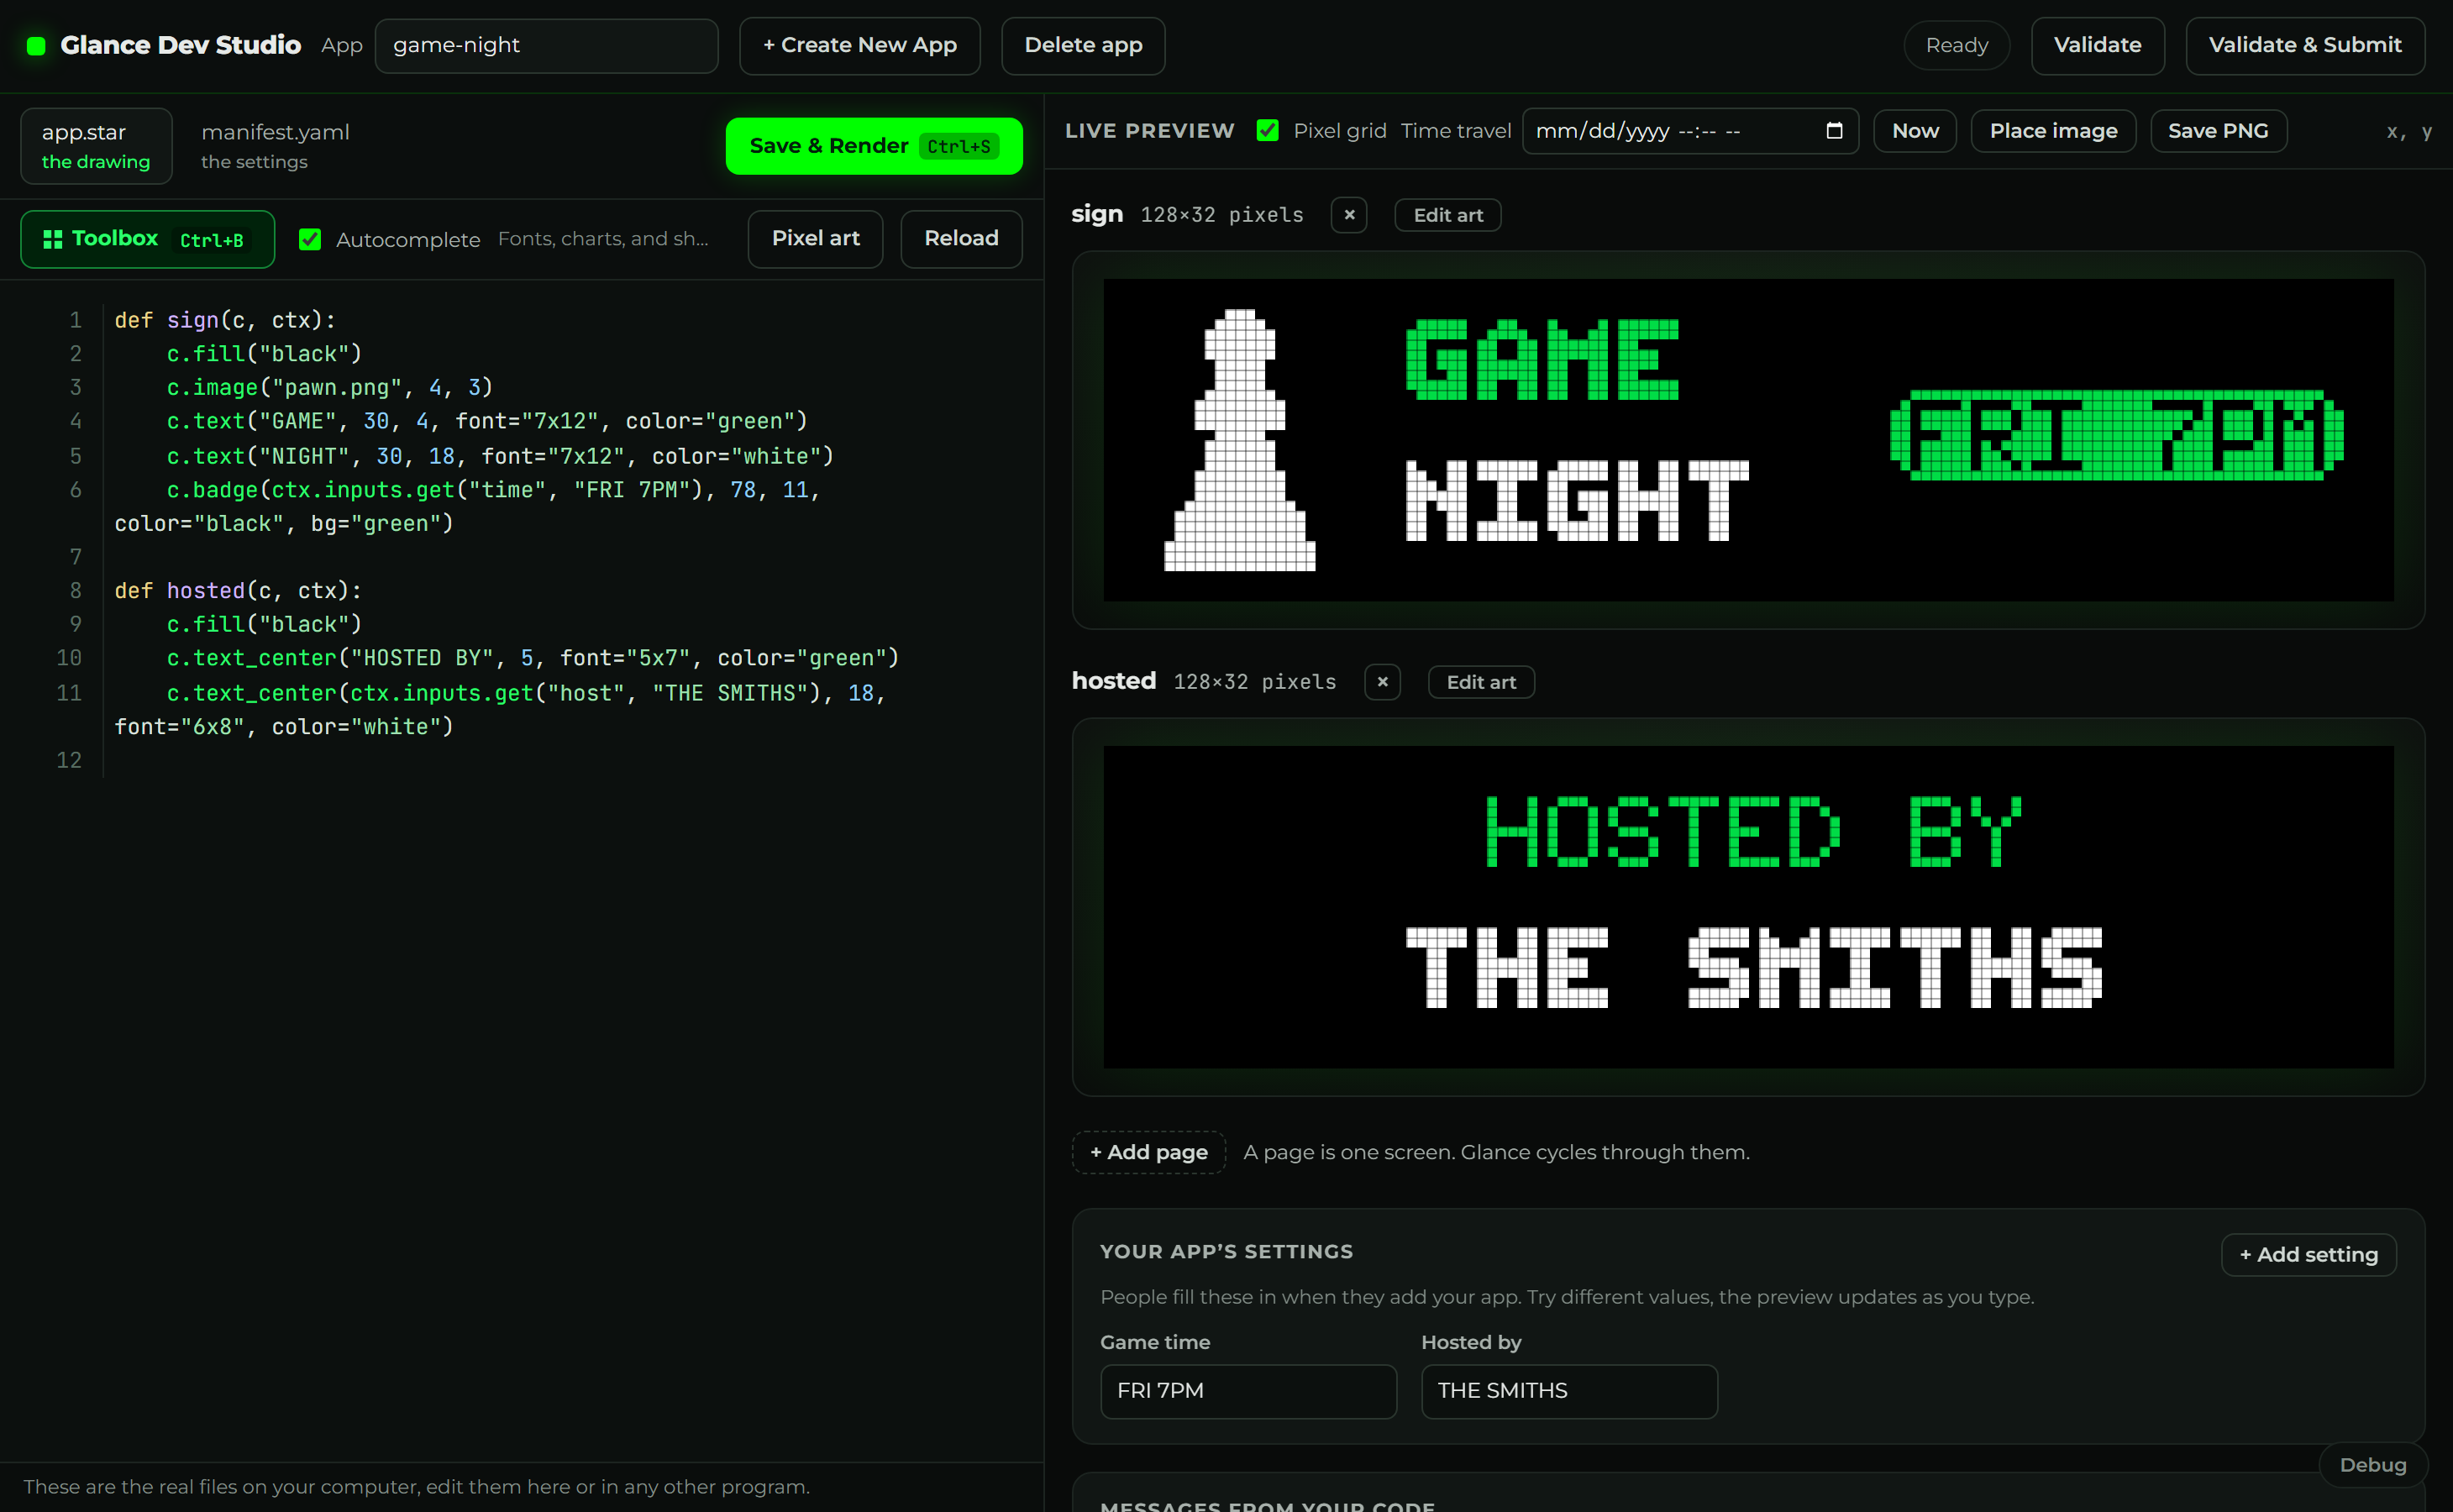
+ Add page wires up both files; the small × on a panel removes a page.Changed your mind about a page? Click the small × on its panel and Studio takes it out of both files for you. (An app always keeps at least one page, so the last one has no ×.) More in Pages.
9. Validate
When it looks right, click Validate at the top of Studio. It renders every page and
runs the same check publishing does: if you forgot to declare pawn.png, used a font that
doesn't exist, or misnamed the page function, it tells you here instead of on the panel.

That's a complete app. Publishing is a pull request, see Publish an app.
The terminal way
Everything above works from the command line too, if you prefer it:
gdn new apps/game-night        # scaffold the folder and two starter files
# edit manifest.yaml and app.star in any editor, add pawn.png
gdn preview apps/game-night    # live browser preview that re-renders on save
gdn validate apps/game-night   # prints PASS game-night (1 page)
See the CLI commands guide for the full set.