A live panel with Cloudflare and AI
You do not have to be a programmer to put a live, data-driven panel on your Glance. This walkthrough takes a ready-made Cloudflare Worker that renders a 192x32 home-monitoring panel, has an AI assistant wire in your data, and deploys it free on Cloudflare. Then you paste one URL into the Glance app. Start to finish: about ten minutes, no server to run and no credit card.

That panel is a single PNG generated on every request by a small piece of JavaScript running on Cloudflare's edge. Your Glance fetches it directly - that is all a private image app does - and redraws it on your refresh interval.
How it works
Every one of these Workers has three layers:
- Data layer - where the numbers come from (random mock values in the starter; real API calls once you wire it up).
- Drawing layer - a tiny bitmap font and icons that paint those values at fixed pixel positions on a 192x32 canvas.
- Output layer - a PNG encoder that returns the canvas as an image.
To make it real you only touch layer 1. The drawing and PNG code stay exactly as they are. Your Glance never runs any of this - it just downloads the finished PNG - so the same public-image rules from the Overview apply here.
What you need
- A free Cloudflare account (no credit card).
- The starter Worker (below).
- About 10 minutes. Nothing to install.
Step 1 - Get the starter Worker
Download the starter file: home-monitor _worker.js
(right-click, "Save link as"). It is one self-contained file - font, icons, layout, PNG
encoder, and mock data. Deployed as-is it already produces the panel above, so you can get
it on your device first and wire in real data after.
Put that file, by itself, in an empty folder named however you like. That folder is what you will upload.
Step 2 - Use AI to plug in your real data
This is the part that used to need a developer. Open any AI assistant, attach the
_worker.js file you downloaded, and paste the prompt below. Fill in the [BRACKETS]
first with your own services - your Home Assistant address, entity names, ZIP, timezone.
The assistant keeps the drawing and PNG code untouched and rewrites only the data layer.
Giving the assistant the actual _worker.js means it edits your real drawing code instead
of guessing at it - the layout, colors, and pixel positions come back exactly as they
were, only the data is now yours.
I have a Cloudflare Worker (_worker.js, attached) that generates a single
192x32 PNG image of a home-monitoring LED panel. Right now it uses mock
random data. Keep the drawing layer (Panel class, font, icons, layout
coordinates, colors) and the PNG encoder exactly as they are - I only want
the data layer replaced so the panel shows real values pulled from external
APIs on every request.

Wire up these data sources:

1. Indoor temp + humidity: Home Assistant REST API at [https://MY-HA-URL]
   - GET /api/states/[sensor.indoor_temperature] and
     /api/states/[sensor.indoor_humidity]
   - Auth: "Authorization: Bearer" long-lived access token, stored as the
     env secret HA_TOKEN (never hardcoded)
2. Outdoor temp: OpenWeatherMap current-weather API for [ZIP/lat,lon],
   API key from env secret OWM_KEY (or my Home Assistant weather entity
   [weather.home] if that is simpler)
3. Door / window / garage states: Home Assistant binary_sensor entities
   [binary_sensor.front_door], [binary_sensor.living_room_window],
   [cover.garage_door] - map "on"/"open" to OPEN (red), otherwise OK (green)
4. Alarm status: Home Assistant [alarm_control_panel.home] - map
   armed_away/armed_home -> ARMED, disarmed -> DISARMED, triggered -> ALERT
   (keep the existing rule that ARMED + any open sensor also shows ALERT)
5. Power now / solar now / today's kWh: Home Assistant energy sensors
   [sensor.home_power_w], [sensor.solar_power_w], [sensor.energy_today_kwh]
6. Clock: keep the existing clock, timezone [America/New_York]

Requirements:
- Fetch all APIs in parallel with a ~5 second timeout each
- If any single API fails, do NOT fail the image: draw that value as "--"
  in gray and render everything else normally
- Cache the fetched data for 60 seconds so frequent panel refreshes do not
  spam my APIs
- Read all URLs/tokens from env, and tell me the exact commands / dashboard
  steps to set each secret
- Numbers must fit the existing layout - clamp/round so nothing collides or
  overflows the 192x32 image
- The response stays exactly what it is now: a single 192x32 PNG on every
  request
- Show me how to test it locally before I deploy

If my Home Assistant is NOT reachable from the internet, briefly explain my
options (Cloudflare Tunnel, Nabu Casa cloud URL, or a middleman API).
The assistant hands you back an updated _worker.js. Save it over the one in your folder.
Step 3 - Deploy to Cloudflare Pages (free, no command line)
Cloudflare Pages hosts and runs the Worker for you, and you can deploy by dragging a folder - no terminal.
1. In the Cloudflare dashboard, open Workers & Pages and click Create application.

2. Choose Pages, then Get started under Drag and drop your files.
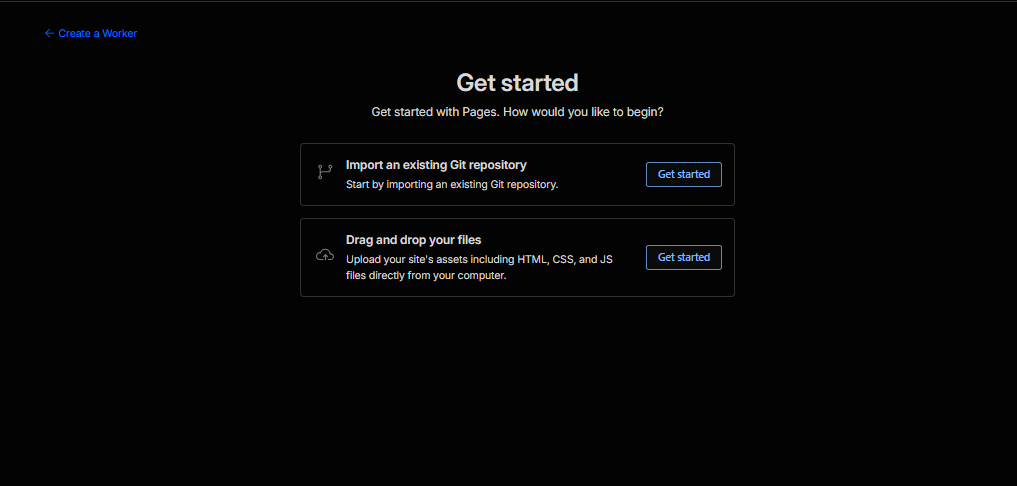
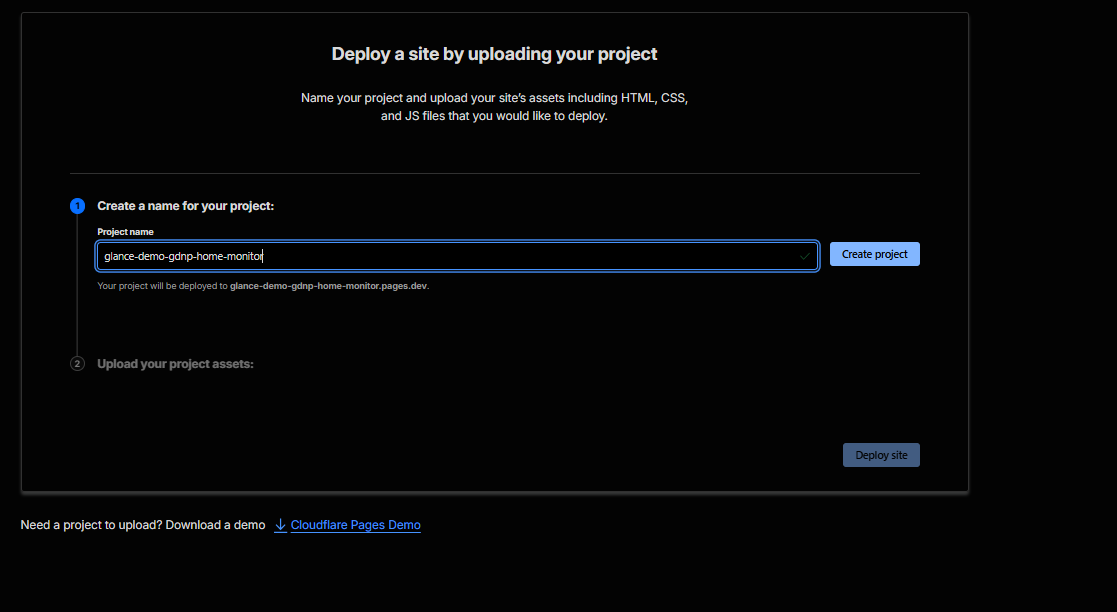
3. Give your project a name (this becomes your URL), drag in the folder that
contains _worker.js, and click Deploy site.
Cloudflare gives you a public address like https://your-name.pages.dev. Open it in a
browser - you should see your panel as a PNG. Cloudflare detects _worker.js in the
folder automatically and runs it for every request.
From the folder, npx wrangler pages deploy . does the same thing.
Step 4 - Add your secrets (only if you wired in real data)
If your AI-updated Worker calls real APIs, it reads keys and tokens from environment secrets, never hardcoded. Set them in the Cloudflare dashboard under your project -> Settings -> Variables and Secrets, or from the command line:
npx wrangler pages secret put HA_TOKEN
npx wrangler pages secret put OWM_KEY
The demo panel needs none of this - it is mock data.
Step 5 - Point Glance at it
Copy your Worker's URL and add it as a private app (see the Overview):
http://your-name.pages.dev/
On its next refresh your Glance fetches the PNG and draws it. That is it - a live, personal panel with no app store and no review.
What it costs: essentially nothing
The free plan includes 100,000 Worker requests per day. A Glance refreshing a panel every few minutes is a few hundred requests a day - orders of magnitude under the limit. And the Worker caches its fetched data for 60 seconds, so no matter how often the image is requested, your upstream APIs (Home Assistant, weather, and so on) are called at most about once a minute. For a personal panel this is free and stays free.
If your data is on your home network
A Cloudflare Worker runs on the internet, so it needs to be able to reach your data. If your Home Assistant or server is only on your LAN, expose it with a free Cloudflare Tunnel and have the Worker call the tunnel's hostname. The prompt above already asks the assistant to explain this for your setup.
The same recipe for a server dashboard
There is a matching starter for server metrics (CPU, memory, disk, temperature, load
average) - the same drawing skeleton, pointed at Netdata, Prometheus, or Glances
instead of Home Assistant. Download
server-monitor _worker.js and use the same
prompt structure, swapping in those data sources.
Whatever you display travels and is stored as a public image. Do not put anything on a panel you would not be comfortable a stranger seeing. See the full rules in the Overview.